Pages

Thursday, December 19, 2013

CQ5/AEM How do I find out exactly which maven dependency I need?

The Problem

You are writing a customization in Java for CQ5/AEM, but the class you need is not currently included in the project, but it is available in CQ5.

You may know what dependency you need, but are unsure as to the version. What is the best way to find the right dependency to include in CQ5?

The Solution

Go to:
http://localhost:4502/system/console/depfinder


This is the package dependency lookup service. If you type in the package/class you need in the field, and click on Find, you will get the dependency you need to include.

Just copy and paste the dependency into your pom file.

Saturday, November 2, 2013

CQ5/AEM Dispatcher gotchya - dispatcher failed to map segment from shared object permission denied

The Problem

Although your dispatcher mod file is there, you can't seem to load the mod_dispatcher file.

The Solution

First, double check in your httpd.conf file that you are actually pointing to the right place. Remember that your ServerRoot is the prefix appended to the mod_dispatcher.so path file.

If the file is where you would expect it to be, check that the user you are running apache under has the rights to see the file.
ls -al
will show full permissions of the directory listing.
chown group:user will change the file ownership

chmod 755 will give read and execute rights to the owner, the group and everyone.

Finally, if you are running Red Hat Enterprise Linux (RHEL), it is possible you are running selinux, and don't even know it.

Have a look under /etc/sysconfig/selinux.

In the file, you may see selinux=enforcing.

If this is the case, then selinux probably doesn't like the dispatcher mod, and is blocking it. You can drop the permissions down to permissive or disable to remove it entirely, but check with your systems administrator, as this will have other effects on the system.

Thursday, October 10, 2013

AEM/CQ5 How do I let users reset their own passwords?

The Problem

How do you allow users to reset their own passwords in the admin interface?

The Solution

I get asked this question so frequently, I thought I would make a blog post about it.

Go to the classic interface, and in the top right hand corner, click on your user button.


If you are logged in as the administrator, you do not get the Set Password option.

If you are logged in as administrator and impersonate a user, you will not see the option either.

I believe that this is what causes the confusion. You actually have to log out, and log in as a different user in the admin interface, and you will see the set password option.

Tuesday, September 24, 2013

AEM/CQ5 SQL2 How do I find all occurrences of a node by name

The Problem

You want to use a SQL2 query to retrieve all nodes that are named "nameofnode"

The Solution

SELECT * FROM [nt:base] AS s WHERE LOCALNAME() LIKE "nameofnode"

The LOCALNAME() function returns the node name. 

Tuesday, June 4, 2013

How to create your own sling adapter

The Problem

You want to create your own implementation of an adaptTo() class

The Solution

Coming Soon

CQ5/AEM What possibilities exist with adaptTo?

The Problem

You want to find out what you can adapt a particular object to, using the adaptTo(Object.class) method.

The Solution

Go to http://localhost:4502/system/console/adapters and have a look for the class in the first column, Adaptable Class.

The next column provides all of the classes that you can adapt the originating class to, any conditions that may be imposed, and the bundle that provides the information.

So for example, if you look up org.apache.sling.api.resource.Resource you will see that one of the listed adaptable classes is com.day.cq.wcm.api.Page

Thus, if you start with a Resource resource, you can do:
Page page = resource.adaptTo(Page.class)

You could even create an adaption of your own. For example, if you have a Node object, you can create an AdaptTo mapping to map to MyCustomNode.

Further items of interest

How to create your own sling adapter.

Tuesday, May 28, 2013

CQ5/AEM how to create and use a custom taglib - part 3 use your tag

If you have not already completed part II, click here

The final step is to use your tag.

In the component of your choice, add the following to a jspx file:


<?xml version="1.0" encoding="UTF-8"?>
<jsp:root xmlns="http://www.w3.org/1999/xhtml"
          xmlns:jsp="http://java.sun.com/JSP/Page"
          xmlns:btes="http://btes.com.au/tagexample"
          version="2.1">
    <jsp:directive.include file="/apps/cqblueprints-example/components/global.jspx"/>
    <p>No tag left behind!</p>
    <btes:customTag content="Custom tag engaged" isHeading="true"/>
</jsp:root>

Now you should see the text "Custom tag engaged" rendered out as a heading. If you change the isHeading boolean to false, you should see it render as a paragraph.

Note that code complete should be fully functional with this example.

CQ5/AEM how to create and use a custom taglib - part 2 create and set up your TLD

If you have not already completed part I, click here.

The next step is to created your .tld directory.

In the taglib project, you will see under src/main/resources, that you have a META-INF directory.

In this directory, create a file named ProjectTaglib.tld

Add the following to this file:

<?xml version="1.0" encoding="UTF-8" standalone="yes"?>
<taglib xmlns="http://java.sun.com/xml/ns/javaee" version="2.1">
    <tlib-version>5.4.0-SNAPSHOT</tlib-version>
    <short-name>btes</short-name>
    <uri>http://btes.com.au/tagexample</uri>
    <tag>
        <name>customTag</name>
        <tag-class>au.com.btes.tagexample.CustomTag</tag-class>
        <body-content>empty</body-content>
        <attribute>
  <name>content</name>
  <required>true</required>
</attribute>
<attribute>
  <name>isHeading</name>
  <required>true</required>
</attribute>
    </tag>
</taglib>

For Part III, click here


CQ5/AEM how to create and use a custom taglib - part 1 create a custom tag.

The Problem

You want to create a custom taglib, and to have code complete in your target JSP file.

The Solution

In your taglib project, Add a new file called TestHeading.java, and include the following code:


package au.com.btes.tagexample;

import java.io.IOException;

import javax.servlet.jsp.JspException;

import com.cqblueprints.taglib.CqSimpleTagSupport;

/**
 * Example custom tag to show either content wrapped within a heading, or content wrapped within
 * a paragraph
 * @author bportier
 *
 */
public class CustomTag extends CqSimpleTagSupport {
private String content;
private boolean isHeading;

@Override
public void doTag() throws JspException, IOException {
String tagString="";

if(isHeading) {
tagString="h2";
}
else {
tagString="p";
}
String message="";
message=message.concat("<").concat(tagString).concat(">");
message=message.concat(content);
message=message.concat("</").concat(tagString).concat(">");
getJspWriter().write(message);
}

public String getContent(){
return content;
}

/**
* Defines the content that the tag will display
* @param content
*/
public void setContent(String content){
this.content=content;
}

public boolean getIsHeading(){
return isHeading;
}

/**
* Defines whether to display a heading (true) or a paragraph (false)
* @param isHeading
*/
public void setIsHeading(boolean isHeading){
this.isHeading=isHeading;
}
}


This has now created your custom tag.


CQ5/AEM how to get JSTL Code complete

The Problem

After including <%@ taglib prefix="c" uri="http://java.sun.com/jsp/jstl/core"%> into your JSP, there is still no code complete for JSTL code, such as <c:set> or <c:out>

The Solution

You need to have the JSTL standard.jar library included in your project libraries.

If you are not using maven, you can download the 1.2 JSTL package from http://archive.apache.org/dist/jakarta/taglibs/standard/binaries/

If you are using maven, include the following in your relevant pom files:


<dependencies>
<dependency>
<groupId>taglibs</groupId>
<artifactId>standard</artifactId>
<version>1.1.2</version>
</dependency>
</dependencies>

Friday, May 17, 2013

CQ5/AEM GOTCHYA - Why you should set all @Reference variables to null

What you should do

When writing sling servelets, all @Reference variables should be set to null

Why

We experienced an issue where when changing pom, reference was still being kept between updates. It seems that if your running servelets have injected an @Reference variable, if a change causes the @Reference variable to not successfully be able to be injected, it will only happen when the instance has been destroyed.

This is confusing as it makes it hard to narrow down which change has caused an @Reference variable to no longer be injected.

The Problem

When using CQ Blueprints, we were getting a strange error coming up when a project was checked out by a new developer, but it was running on everyone elses machines.


Failed to execute goal com.squeakysand.jsp:jsptld-maven-plugin:0.4.0:generate (default) on project taglib: Execution default of goal com.squeakysand.jsp:jsptld-maven-plugin:0.4.0:generate failed: cannot generate report -> [Help 1]

The Solution

The problem was that the taglib project could not be generated, because at that stage of the project, we had no taglibs to include yet, and we deleted the GoodbyeWorld tag and Activator class. Hence, there was nothing to build in the project, and the target directory was left empty, which caused all dependant projects to not be able to compile.

Hence, if the project was built once with at least the Activator class left in, the target build would be created, and there would be no error, only on new machines.

So, if you leave at least the Activator class, or add a dummy tag/activator for the tag, your project should build successfully.

Tuesday, April 30, 2013

CQ5/AEM How to skin the login page

The Problem

You want to customize the images displayed for the CQ5.5 login page

The Solution

You need to take a copy of the libs/cq/core/content/login node, and copy it to apps/cq/core/content/login.

If you don't already have the following folder structure, create the following by going to localhost:4502/crxde 

Right click on apps, create folder and call it:
cq

right click on the newly created cq folder, and create a new folder named: 
core

right click on core, and create a content folder

go to /libs/cq/core/content/login, copy the folder, and paste it into your newly created core folder.

You should see the following:


To replace the background of the login page, replace background.png with an image of your choice.

Do the same for all of the relevant background screens.

The images folder contains all of the additional images for the login screen. You can go through these one by one to customize the page.

If your desired customization needs to go further than simply replacing images, you can change the login.css and login_ie.css style sheets.

Further Reading

Wednesday, April 3, 2013

How to customize the default UI in CQ5.6

The Problem

You want to use the old style admin interface in CQ5.6 rather than the new touch style.

The Solution

Go to the OSGi Console at:
http://localhost::4502/system/console/configMgr

Find the Day CQ Root Mapping component.

Edit settings by clicking on the wrench or pencil (depending upon where you are).

Change the Target Path to /welcome.html

Click on OK, log out and login again.

If you want the touch interface back, revert /welcome.html back to /projects.html

Wednesday, March 27, 2013

Monday, March 25, 2013

ERROR Failed to execute goal (install-package)

The Problem

Failed to execute goal org.codehaus.mojo:exec-maven-plugin:1.2:exec (install-package) on project bigpondpoc-content: Command execution failed. Cannot run program "curl" (in directory "C:\Documents and Settings\username\workspace\myproject\content"): CreatePRocess error=2, The system cannot find the file specified -> [Help 1]

The Solution

You have not installed cURL on your system.

Download cURL from http://curl.haxx.se/download.html and download the latest zip file.

If running under windows, unzip it to a folder of your behest and add a path variable to that folder using your windows environment variables.

(Windows Key + Break, to bring up Control Panel\System and Security\System.
Advanced System Settings
Environment variables
Under system variables, find path, and add ;c:\myPathToCurl)

This should resolve the issue.

How to change the root publish page from /content/geometrixx-outdoors/en.html to what you require

The Problem

When you type in http://www.yourwebsite.com you get redirected to

http://www.yourwebsite.com/content/geometrixx-outdoors/en.html

The Solution

It is best to fix the core of the problem, which is the target redirect on the /content folder.

A bit of mechanical sympathy first, however.

When you type in the default / url, cq5 will look at the Target Path setting in the Day CQ Root Mapping component.

This setting by default is set to /content.html

You can change the url at this point, however, it is not advisable to do so, as if the url ever changes, you will need to make a configuration change, rather than a content change.

So when you first hit the / directory, the Day CQ Root Mapping servlet changes the request to be /content

Within the /content folder, which can be viewed by using CRXDE Lite/Explorer, you will see that the sling:target setting, is to /geohome.

/geohome is set as the vanityPath for the geometrixx-outdoors site, which in turn has a redirectTarget set to /content/geomtetrixx/en

So if we change the /content folder to have the next correct address, such as /mysite or the equivalent starting point coded into the author instance, this will then replicate seamlessly to the publisher, and means that you don't have to rely upon apache rewrite rules to serve up the correct website.

AEM CQ5.6 How to change the admin password

The Problem

You want to change the cq5.6/AEM admin password on the publish and server instance.

The Solution

Go to: (Or whatever the address/port of your admin instance is)
http://localhost:4502/libs/granite/security/content/admin.html

Double click on the admin user, scroll down, click on the pencil icon, and change the admin user. NOTE: the first password is the new password, and the second password in the current password. So, for a fresh install, put in the new password first, followed by admin as the second password.

Repeat for
http://localhost:4503/libs/granite/security/content/admin.html or equivalent.

Wednesday, March 20, 2013

CQ5/AEM How to customize your workflow completed email and cater for different languages

The Problem:

You want to customize your workflow completed email, and add support for different languages.

The Solution:

1. Open CRXDE Lite by going to:
http://localhost:4502/crx/de
2. Go to /etc/workflow/notification/email/default/en.txt
3. Double click to open the file and customize away.

If you want to have different languages, make a copy of the en.txt file, and name it to the specific language(s). i.e. fr.txt de.txt nl.txt

How to send an approval or rejection email in a CQ5/AEM page publishing workflow

The Problem

You want to send an email in a workflow to send an email to the author of a page, that a page has been approved or rejected.

The Solution

1. Set up email on your CQ5/AEM author instance with these instructions.
2. Create a new workflow by logging into the admin interface, and going to:
http://localhost:4502/libs/cq/workflow/content/console.html

3. Click on the New button in the top left hand corner
4. Enter the title and name for your workflow. In this case:
Title: Page Approval Workflow
Name: page-approval-workflow
Click on OK.
5. Double click on the new workflow
6. You will see Step 1 as being an approval step from an administrator. You can double click on this step and change it to any group that you want to approve the article for publish. In this case, we will keep this as an admin user.
7. on the sidekick, go to Workflow, and find the OR Split process, and drag it on just after Step 1
8. on the sidekick, go to Collaboration Workflow, and find the Send Email component.
9. Drag and drop the Send Email component onto both splits of the workflow.
10. Double click on the email step on the left, and name it Approve Page, and give a description along the lines of Approve Page and sends an email to the initiator of the workflow.
11. Double click on the email step on the right, and name it Reject Page, and give a description along the lines of Reject Page with a description along the lines of Sends an email to the initiator of the workflow that the page has been rejected.
12. Click on Save
13. Open a new browser window, and go to crxde lite by navigating to:
http://localhost:4502/crx/de
14. Go to the following directory:
/etc/workflow and create a new folder named "demoproject"
15. create a folder inside called email
16. create a new file called emailapproval.txt
17. create a new file called emailrejection.txt
18. Click Save All
19. double click on emailapproval.txt and enter something along the following lines (Only enter the parts between, but not including the <<<<<<>>>>>>  characters

Note, instead of my.name@whoeveryouare.com, enter the email address you set up as the CQ Mail Service user. I.e. john.doe@gmail.com This avoids any malarkey with spam filters.

<<<<<<<<<<<<Start of File>>>>>>>>>>>>>>>

From: My Name <my.name@whoeveryouare.com>
To: ${initiator.email}
Subject: Page Approval Granted

Hi ${initiator.name},
Your page ${payload.path} has been approved and published.

Regards,
Your local friendly CQ5 Admin


-----------------------------------------
All Workflow properties:
${properties}

<<<<<<<<<<<<End of File>>>>>>>>>>>>>>>

20. Double click on emailrejection.txt and enter the following

<<<<<<<<<<<<Start of File>>>>>>>>>>>>>>>

From: My Name <my.name@whoeveryouare.com>
To: ${initiator.email}
Subject: Page Rejected

Hi ${initiator.name},
Your page ${payload.path} has been rejected. Please make changes and resubmit for approval.

Regards,
Your local friendly CQ5 Admin

<<<<<<<<<<<<End of File>>>>>>>>>>>>>>>

21. Click on Save all, and go back to your workflow window.
22. Double click on the Approve Page step
23. go to the Arguments tab, and enter the following as the email template path:
/etc/workflow/demoproject/email/emailapproval.txt
24. click OK
25. Double click on the Reject Page step

26. go to the Arguments tab, and enter the following as the email template path:
/etc/workflow/demoproject/email/emailrejection.txt
27. click OK
28. Go to the sidekick, and select the WCM Workflow tag.
29. Add the activate page/asset step to the left hand side of the OR tag, just after the approval tag.
30. Click on Save
31. Go to the users section, and add a new user belonging to the content-authors group, with your email address specified as the user's email. You will also need to add the user to the workflow-users group.
32. In a seperate browser, log in as the newly created user.
33. Go to:
http://localhost:4502/siteadmin#/content/geometrixx-media/en
34. Click on the workflow button after highlighting the gadgets page.
35. Select page approval workflow and submit.
36. Go to the original browser, where you are logged in as admin, and navigate to:
http://localhost:4502/inbox
37. Double click on the page, and you will see the page appear in edit mode.
38. Go back to the inbox page as in step 36, and click once on the workflow.
39. Click on complete.
40. Drop down the Next step combobox, and select reject.
41. Click OK.
42. The workflow should have been rejected at this point, and an email sent to the originator of the workflow process.
43. Repeat the process with your newly created user and resubmit the page. This time, as the admin user, approve the workflow.
44. You will see that the page has been published, and you should have received an email telling you that your page has been approved.

GOTCHYA: CQ5/AEM Could not start workflow

The Problem

You are logged in as a non-admin user, and when you try to initiate a workflow, you get a popup message stating "Could not start workflow".

The Solution

Your user probably is not added to the workflow-users group, which grants permission to initiate workflows. Add the user or the user's group to the workflow-users group, and your problem is solved.

Sunday, March 10, 2013

Explosion when trying to access JCR repository

The Problem

I was trying to access the JCR via the following code.

                try {
repository = JcrUtils.getRepository("http://localhost:4502/crx/server");
} catch (RepositoryException e1) {
// TODO Auto-generated catch block
e1.printStackTrace();
}

CSVImageImporter csvImageImporter=new CSVImageImporter();
try {
Credentials cd = new SimpleCredentials("admin", "admin".toCharArray());
session=repository.login(cd);
                }

This resulted in the following exception:


javax.jcr.RepositoryException: Unable to access a repository with the following settings:

    org.apache.jackrabbit.repository.uri: http://localhost:4502/crx/server
The following RepositoryFactory classes were consulted:
    org.apache.jackrabbit.commons.JndiRepositoryFactory: declined
Perhaps the repository you are trying to access is not available at the moment.
at org.apache.jackrabbit.commons.JcrUtils.getRepository(JcrUtils.java:204)
at org.apache.jackrabbit.commons.JcrUtils.getRepository(JcrUtils.java:244)
at au.com.someone.dam.csvimporter.ImportImageCSVTest.importCSVTest(ImportImageCSVTest.java:21)
at sun.reflect.NativeMethodAccessorImpl.invoke0(Native Method)
at sun.reflect.NativeMethodAccessorImpl.invoke(Unknown Source)
at sun.reflect.DelegatingMethodAccessorImpl.invoke(Unknown Source)
at java.lang.reflect.Method.invoke(Unknown Source)
at org.junit.runners.model.FrameworkMethod$1.runReflectiveCall(FrameworkMethod.java:44)
at org.junit.internal.runners.model.ReflectiveCallable.run(ReflectiveCallable.java:15)
at org.junit.runners.model.FrameworkMethod.invokeExplosively(FrameworkMethod.java:41)
at org.junit.internal.runners.statements.InvokeMethod.evaluate(InvokeMethod.java:20)
at org.junit.runners.BlockJUnit4ClassRunner.runChild(BlockJUnit4ClassRunner.java:76)
at org.junit.runners.BlockJUnit4ClassRunner.runChild(BlockJUnit4ClassRunner.java:50)
at org.junit.runners.ParentRunner$3.run(ParentRunner.java:193)
at org.junit.runners.ParentRunner$1.schedule(ParentRunner.java:52)
at org.junit.runners.ParentRunner.runChildren(ParentRunner.java:191)
at org.junit.runners.ParentRunner.access$000(ParentRunner.java:42)
at org.junit.runners.ParentRunner$2.evaluate(ParentRunner.java:184)
at org.junit.runners.ParentRunner.run(ParentRunner.java:236)
at org.eclipse.jdt.internal.junit4.runner.JUnit4TestReference.run(JUnit4TestReference.java:50)
at org.eclipse.jdt.internal.junit.runner.TestExecution.run(TestExecution.java:38)
at org.eclipse.jdt.internal.junit.runner.RemoteTestRunner.runTests(RemoteTestRunner.java:467)
at org.eclipse.jdt.internal.junit.runner.RemoteTestRunner.runTests(RemoteTestRunner.java:683)
at org.eclipse.jdt.internal.junit.runner.RemoteTestRunner.run(RemoteTestRunner.java:390)
at org.eclipse.jdt.internal.junit.runner.RemoteTestRunner.main(RemoteTestRunner.java:197)

The Solution

Although I had added :
                    <dependency>
      <groupId>org.apache.jackrabbit</groupId>
    <artifactId>jackrabbit-jcr-commons</artifactId>
    <version>2.2.0</version>
   </dependency>

To my pom, I also needed to add:
                        <dependency>
<groupId>org.apache.jackrabbit</groupId>
<artifactId>jackrabbit-jcr2dav</artifactId>
<version>2.6.0</version>
</dependency>

Friday, March 1, 2013

Reset forgotten password in CQ5.4

The Problem

The administrator password has been forgotten for a CQ5.4 instance.

For CQ5.5 click here
For CQ5.6 click here

The Solution

Go to /crx-quickstart/server/etc/server.xml

find the <admin> node, and replace the whole fragment with

<admin>
<crypt>adpexzg3FUZAk</crypt>
</admin>

Your password should be reset to admin:admin again.


Reset forgotten password in CQ5.6

Leave a comment to prioritise this post to be written by me.

Reset forgotten password in CQ5.5

Leave a comment to prioritise this post to be written by me.

Monday, February 18, 2013

CQ5 how to purge your versions

The Problem

You want to clean out previous versions of image assets and page content manually.

The Solution

Go to http://localhost:8080/etc/versioning/purge.html

Confirm that you wish to purge from the content layer, or whether you wish to purge from a deeper position.

Set the maximum number of versions you want to keep.
Set the maximum number of days you want the age of the versions to be.

Click on Purge.

Wednesday, January 30, 2013

Cross Referencing Text between pages


If you want to reference images on the same page, read this blog entry.

The Problem

You have a range of products with prices that you want to update in several places on your site.

The Solution

1. Create the product/price pair list with a each price pair being a custom component, or a text component.

IE
<TextComponent> Square   $10.00 </TextComponent>
<TextComponent> Triangle   $20.00 </TextComponent>
<TextComponent> Circle   $30.00 </TextComponent>

2. In your target pages, use a Reference component where you would like the price listed.
3. Double click on the reference component
4. Click on the magnifying glass, and navigate to your prices page, and select the price that you want.

Whenever you update the price list, all pages containing the prices will be automatically updated for you.

Bonus Points

You can lock the price page for editing, so that authors won't accidently update your prices across the entire website.

1. Go to the pricing page you have set up
2. Click on the Page tab on the sidebar

3. click on Lock Page
4. The page is now successfully locked so that only you can edit it.

To allow users who have write access to the page to edit again, click on unlock page.

CQ5 - Reference copy of images to reduce download time

The Problem

You have an image that should be exactly the same on different parts of the same page.

The Solution

Copy and Paste the image by reference.

1. Go to the page containing the original image.
2. Highlight the image, and press Ctrl-C to copy
3. Highlight the area where you want to display the second instance of the same image. Press Ctrl-Alt-V to paste as reference.

You will notice that when you update the image content and refresh the page, the same image URL is used.

It is worth noting that you must refresh the page for changes to take effect for referenced image copies.

If you want to cross reference data, read this blog entry.

Setting up GMail as your SMTP server in CQ5

The Problem

You want to set up an SMTP server to let you send mail out of your local instance of CQ5 author.

The Solution

Set up a GMail account (or use your own if you feel comfortable where you are storing the information).

The steps:

1. Go to the Felix Console
    http://localhost:4502/system/console/configMgr
2. Scroll down and click to edit the Day CQ Mail Service OSGi config.
3. Enter the following details:
    SMTP Server Host   - smtp.gmail.com
    SMTP Server Port    - 465
    SMTP User              - your username (i.e. john.doe@gmail.com)
    SMTP Password      - your password
    From Address          - your email
    SMTP Use SSL      - true

4. Hit Save
5. Run a user through a workflow containing a group of which you are a member, or send out a newsletter to a group which you are a part of.

You should receive the email in your inbox.

It is worth noting that for production environments, you should set up a production grade SMTP service rather than use GMail.

Sunday, January 27, 2013

How to restrict activation rights in cq5 to a particular user group

The Problem

You want to prevent a particular user group from having the rights to activate a DAM image and instead require them to follow a publish workflow.

The Solution

1. Log in as administrator.

2. Click on the Users link
3. Double click on the user group you wish to restrict Activate / Deactivate access to.

In this case, we will use content-authors

4. Click on the permissions link
Navigate down to /libs/wcm/core/content/damadmin/tabs/searchpanel/actions/
Unselect Read Access for Activate and Deactivate.

Navigate down to /libs/wcm/core/content/damadmin/actions
Unselect Read Access for Activate and Deactivate.

Next, log in as a user who belongs to only the content-authors group such as author.

Alternately, you can impersonate the user, by clicking on Administrator in the top right hand corner, and selecting author as the user to impersonate. If you accidently select a user without dam rights, have a look at this post.

If you navigate to the dam, you will notice that under this user, the activate and deactivate options are no longer available to this user.

Next, Using a Workflow to publish DAM images through an approval process.

Thursday, January 24, 2013

CQ5 - Gotchya - when impersonating as another user, cannot access admin

The Problem

When impersonating as a user without admin rights, you are immediately locked out of cq5 admin, and cannot log back in, even as an administrator.

The Solution

You need to have read rights to the admin section to be able to log in, even when as an administrator. The cleanest way to get your admin user account back, is to log out, by pasting the following URL into your browser. (Assuming you are on localhost and your port is 4502).

http://localhost:4502/libs/cq/core/content/login.logout.html

Wednesday, January 23, 2013

How to create a custom multifield component

The Problem

You are trying to capture a list of key/pair values in a custom component in the admin interface.

The Solution

Create a custom multified component to capture values.

1. Create multifield component

1.1 Create the component

The first thing we are going to do is to create a new component for our tutorial project. This component will be visible in the siteadmin editor.

Open up CRXDE and create a new components directory in the following location:
\apps\tutorial\components\ConfigComponent

Right click on the apps folder-> New -> Folder. Name this tutorial
Right click on the tutorial folder->New -> Folder. Name this components
Right click on the components folder -> New -> Component

Label -> ConfigComponent
Title -> Config Component
Description -> Key pair configuration component
Super Resource Type -> blank
Group -> Admin (Or whatever group you want this component to live in)

Click on next

in AllowedParents enter
*/*parsys

Click on finish.

You have now created your new skeleton component. 

1.2 Create the component display

If you look into the ConfigComponent directory, you will see a ConfigComponent.jsp file.

This jsp will be the component as it renders for display.

In this case, I have decided both for backwards compatibility reasons, and simplicity, to use a table. You can style this in whatever fashion that you desire, however, for the purposes of this tutorial, we will keep it vanilla.

Note, we could also abstract this functionality out into seperate java classes etc, but again, for simplicity, we will just do this in a vanilla fashion.

<%@include file="/libs/foundation/global.jsp"%>Configuration Settings
<table>
    <tr>
        <th>Key</th>
        <th>Value</th>
    </tr><%
   PropertyIterator propertyIterator= currentNode.getProperties();
   while(propertyIterator.hasNext())
   {
  Property currentProperty=propertyIterator.nextProperty();
  String currentValue="";
  if(currentProperty!=null && 
  currentProperty.getName()!=null && 
  currentProperty.getName().toLowerCase().compareTo("keyvaluepairs")==0)
  {
  if(currentProperty.isMultiple())
  {
  Value[] values=currentProperty.getValues();
  for(Value value:values)
  {
  currentValue=value.getString();
  String[] splitValue=currentValue.split("#");
  %><tr><%
  for(int splitLoop=0; splitLoop< splitValue.length; splitLoop++)
  {
       %><td><%= splitValue[splitLoop] %></td><%
  }
  %></tr><%
  }
  }
  else
  {
  currentValue=currentProperty.getString();
      %><td><%= currentValue %></td><%
  }
  }
  properties.isEmpty();
   }
%></table>

What we are doing in this code, is taking the current node:
PropertyIterator propertyIterator= currentNode.getProperties();

and iterating through its properties.

   while(propertyIterator.hasNext())

We then get the values from the property keyvaluepairs, and split the value by the delimitation of a hashtag.

We follow the route of separating values by hashtag, as we wish to avoid having to rewrite the multi-field component entirely. Note that if the # character is a requirement for the field, you can use a multi character delimeter.

1.3 Create the component Dialog

Right click on the ConfigComponent folder -> New Dialog

Name -> dialog
Title -> Key Value Pairs

Click on finish
Navigate down to the tab 1 node, and change the title to Key Value Pairs

Right click on tab1 -> new -> Node
Name -> items
Type -> cq:WidgetCollection

Click Finish

Right click on items -> new -> Node
Name-> trainingmulti 
Type -> cq:Widget

Set the following properties on the trainingmulti node
fieldLabel -> Key Value Pairs
jcr:primaryType -> cq:Widget
name -> ./keyvaluepairs
xtype -> multifield

So what have we done so far? We've created a component that displays a table of values coming from ./keyvaluepairs.

So if we go to our siteadim, open a geometrixx page, and create a template with a parsys such as wide page.


On the sidekick, click on switch to design mode.


Click on edit, scroll down to Admin, or whatever group you've added the component to, and enable the component for inclusion in the sidekick.

If you expand the sidekick again, you should be able to see the component either in Admin section, or the Other section, depending on how many other groups you have enabled.

Add the component to parsys on the left by dragging and dropping it on.

You won't see any key pairs or information at this point in time.

Double click on the component to open the edit dialog.

Click the add button to add a new row, and enter the following:
Test Pair one
Test#Pair two


2. Create custom dual textfields

2.x Hooking in the custom xtype
create  new node on the trainingmulti node of an nt:unstructured type

Add the xtype property of trainingSelection.

Add the xtype component -> list out error

3. Customize display to show read only fields


How to create a custom multifield component.

Gotchyas

1. XType component not registered/found

Tuesday, January 22, 2013

gotchya! cq:console has problems with vanitypath

The Problem

You are trying to implement a cq:console mixin to a page component to provide a custom admin interface by using the cq:console mixin, and now the welcome screen no longer renders, as you get the following error:

GET /apps/cq/core/content/welcome.html HTTP/1.1] org.apache.sling.engine.impl.SlingRequestProcessorImpl service: Uncaught SlingException org.apache.sling.api.SlingException: An exception occurred processing JSP page /apps/cq/core/components/welcome/welcome.jsp at line 135

The Solution

What is happening here, is that the sling:vanityPath is failing, as the mixin by default specifies a String[], but the underlying Java component expects sling:vanityPath to be a single String.

Delete the sling:vanityPath variable, and recreate it as just a flat String, rather than an arrayed String[].

Thursday, January 10, 2013

How to write a custom SlingServlet


The Problem(s)

You want to write a custom SlingServlet to render a HTML page, or generate JSON to be consumed by a front end such as a mobile device.

You also want the OSGI bundle to have its settings editable in the Felix Console.

The Solution

So you want to make a configurable OSGI bundle to allow various items to be changed in the Felix Console?

Let's take look at a servlet that reads some settings from the internal config, and replaces any text from a webpage and re-renders the text in the client.

Note, if you are getting code complete issues due to some packages not being recognized by CRXDE, then take a look here to see if it solves your problem.

Step 1 - Create a bundle

Bundles are a set of files with a manifest that CQ5 can install.

Create standard nt:folder to represent your application. In this case, we'll call it SlingServlet.

1. Open up CRXDE Lite. 
2. Right click on the apps folder, click on create folder, and call it SlingServletExample.
3. VERY IMPORTANT: Right click on the SlingServletExample folder and create a folder called install. Note, the install folder should be /apps/SlingServletExample/install. Failure to do so will mean your bundle will not automatically be deployed. See the gotchya below for full details
4. Right click on the SlingServletExample folder, click on new->Create Bundle. Fill in the Symbolic Name and Name to be WebpageTransformer. Type "Transforms webpages" into the description, and give it a package name of org.example.slingservlet.transformer. Click OK.
Congratulations. You've created a bundle. 

BEFORE YOU MOVE ON: 

Bit of a gotchya here. If you look at the WebpageTransformer.bnd package, you'll see the following two lines:
# Export-Package: *
# Import-Package: *

This is a bit of a nasty one, as to access this bundle from the outside world, you'll need to remove the # from both lines, or else all packages will remain as private only.

For full details, see the gotchya link below.

Step 2 - Create the Transformer Sling Servlet

Right click on the transformer folder, and click New -> Class

Name it TransformerClass, and set superclass to be org.apache.sling.api.servlets.SlingSafeMethodsServlet

Click on Finish.

This example takes a webpage, and transforms a supplied set of text into another set of text.

Here is the full TransformerClass.java contents.

TransformerClass.java

package org.example.slingservlet.transformer;

import java.io.BufferedReader;
import java.io.IOException;
import java.io.InputStream;
import java.io.InputStreamReader;
import java.io.PrintWriter;
import java.net.HttpURLConnection;
import java.net.URL;
import java.rmi.ServerException;
import java.util.Dictionary;

import org.apache.felix.scr.annotations.Properties;
import org.apache.felix.scr.annotations.Property;
import org.apache.felix.scr.annotations.Reference;
import org.apache.felix.scr.annotations.sling.SlingServlet;
import org.apache.sling.api.SlingHttpServletRequest;
import org.apache.sling.api.SlingHttpServletResponse;
import org.apache.sling.api.servlets.SlingSafeMethodsServlet;
import org.apache.sling.commons.osgi.OsgiUtil;
import org.apache.sling.jcr.api.SlingRepository;
import org.osgi.service.component.ComponentContext;

@SlingServlet(paths="/bin/mySearchServlet", methods = "GET", metatype=true)
@Properties({
@org.apache.felix.scr.annotations.Property(name="PAGE-PROVIDER", description="Page Provider Address", value="http://www.google.com"),
@org.apache.felix.scr.annotations.Property(name="SOURCE-TEXT", description="Source Text to Replace", value="Search"),
@org.apache.felix.scr.annotations.Property(name="TARGET-TEXT", description="Target Replacement Text", value="Find of Awesomeness")
})
public class TransformerClass extends SlingSafeMethodsServlet {
private static final long serialVersionUID = 2598426539166789515L;

public static final String PAGE_PROVIDER="PAGE-PROVIDER";
public static final String SOURCE_TEXT="SOURCE-TEXT";
public static final String TARGET_TEXT="TARGET-TEXT";
private String pageProvider;
private String sourceText;
private String targetText;
@SuppressWarnings("unused")
@Reference
private SlingRepository repository;
protected void activate(ComponentContext componentContext){
configure(componentContext.getProperties());
}
protected void configure(Dictionary<?, ?> properties) {
this.pageProvider=OsgiUtil.toString(properties.get(PAGE_PROVIDER), null);
this.sourceText=OsgiUtil.toString(properties.get(SOURCE_TEXT), null);
this.targetText=OsgiUtil.toString(properties.get(TARGET_TEXT), null);
}
@Override
protected void doGet(SlingHttpServletRequest request, SlingHttpServletResponse response) throws ServerException, IOException {
URL serverAddress=null;
BufferedReader reader=null;
HttpURLConnection internalHttpRequest=null;
PrintWriter responseWriter = response.getWriter();
try
{
serverAddress=new URL(pageProvider);
internalHttpRequest = (HttpURLConnection)serverAddress.openConnection();
InputStream in=null;
try
{
in = internalHttpRequest.getInputStream();
}
catch(Exception e)
{
responseWriter.append(e.toString());
}
if(in!=null)
{
reader = new BufferedReader(new InputStreamReader(in));
}
}
finally
{
if(reader!=null)
{
String line=null;
while((line=reader.readLine()) != null)
{
responseWriter.append(line.replace(sourceText, targetText) + "\n");
}
}
responseWriter.flush();
if(internalHttpRequest!=null)
{
internalHttpRequest.disconnect();
}
}
}
}

Servlet Address
@SlingServlet(paths="/bin/mySearchServlet", methods = "GET", metatype=true)

CQ5 utilises Java Annotations to configure classes.

Here, we are setting the SlingServlet annotation to have 3 values:
paths, methods and metatype.
The paths variable allows you to set the url that will resolve to the slingservlet.

In our case, if you access http://localhost:4502/bin/mySearchServlet, you will be served the servlet, rather than whatever may reside there in the JCR.

Methods specifies a GET method

The metatype option being set to true, instructs CQ5 to provide a config page in the Felix console.

Servlet Properties

The @Properties annotation contains multiple @Property annotations contained in our Sling Servlet.

It is worth noting that if you are using javax.jcr.Property to get a property from a JCR Node, you will have a common namespace conflict with the org.apache.felix.scr.annotations.Property.

I personally think that it's best to use org.apache.felix.scr.annotations.Property as the inline declaration, rather than javax.jcr.Property, as the Property is something that is generally still readable in long format, and won't influence the legibility of your code.


@SlingServlet(paths="/bin/mySearchServlet", methods = "GET", metatype=true)
@Properties({
@org.apache.felix.scr.annotations.Property(name="PAGE-PROVIDER", description="Page Provider Address", value="http://www.google.com"),
@org.apache.felix.scr.annotations.Property(name="SOURCE-TEXT", description="Source Text to Replace", value="Search"),
@org.apache.felix.scr.annotations.Property(name="TARGET-TEXT", description="Target Replacement Text", value="Find of Awesomeness")
})


Here you can see that the individual @Property has a number of values that will be visible via the OSGI console:


Property NamePurpose
nameThe name of the property used as the key to retrieve it later in the configure function
descriptionThe text that is used to describe the property in the OSGi property editor
valueThe default value that should be used for the property in the OSGi console.
*It is worth noting that if you add a subsequent property to a previously configured or saved OSGi console, the default value will not be used. Also, if the default value is changed in code, the default settings will need ot be manually invoked during a deploy, even if the package has been reinstalled.

Each servlet Class is instantiated as a stateless singleton when CQ5 is started, save for any global configuration values. These values need to be loaded from the config when the servlet is activated in the following function:


protected void activate(ComponentContext componentContext){
configure(componentContext.getProperties());
}

The activate function is called via the SlingServlet interface (If you know the specific interface, please comment below, short on time to find it right now.) when the Bundle is activated.

The activate function calls our own configure function, which gets a property dictionary.


protected void configure(Dictionary<?, ?> properties) {
this.pageProvider=OsgiUtil.toString(properties.get(PAGE_PROVIDER), null);
this.sourceText=OsgiUtil.toString(properties.get(SOURCE_TEXT), null);
this.targetText=OsgiUtil.toString(properties.get(TARGET_TEXT), null);
}

Here, we set our private variables with the OsgiUtil.toString function. Note that this class has been deprecated, but as of CQ5.5, I am not aware of a cleaner way of doing this. If you know of one, please comment below.

The final thing you need to know is that you must override the following function:

@Override
protected void doGet(SlingHttpServletRequest request, SlingHttpServletResponse response) throws ServerException, IOException {

Note, that you have access to both the request and response, and can do whatever you need it to do.

I shall leave it to the reader to go through my code for the page transformation.


Step 3 - Build the servlet

The first thing to make sure of is that your install folder is in the right place. (read Step 1-3 very carefully. IF YOU DO NOT DO THIS, YOUR COMPONENT WILL NOT AUTOMATICALLY INSTALL DURING BUILD).

Double click on the WebpageTransformer.bnd file, and increment the Bundle Version number. If you do not increment the number, CQ5 may get confused and not automatically deploy your bundle.

When you are happy, right click on the ProviderAssets.bnd file, navigate to the Build sub menu, and click on Build Bundle.

If everything goes well, your bundle should be built and deployed.

Step 4 - Configuring your bundle

Navigate to your felix OSGi console.

http://localhost:4502/system/console/configMgr

Find your WebpageTransformer Bundle in this list. To the right, you should see a pencil icon. If you don't, check your metadata is correct, and contains metatype=true.
@SlingServlet(paths="/bin/mySearchServlet", methods = "GET", metatype=true)

take note of the settings, and make sure that they are default.

Navigate to http://localhost:4502/bin/mySearchServlet

If nothing comes up, you may need to change Apache Sling Servlet/Script Resolver and Error Handler config on this page.

Search for it, and click the pencil to edit your config, and look at your execution paths. You may need to add /bin/ to your execution paths if any are specified.

Once you can see the page, notice that it displays the google page, except the Search button displays Find of Awesomeness as the button label.

You can play with the settings, update them, and see the changes on the servlet page.

Discussion

Sling Servlets are a very handy tool to convert anything in your JCR to JSON, to aggregate and expose data sources to other components and applications in your ecosystem, or to provide an endpoint for the wild for any information you need to supply.

You can integrate the servlet with your security engine, and generally do whatever needs to be done.

If you want to access the JCR repository from a sling servlet, this tutorial may possibly be of assistance to you.

How to limit the number of characters in a DAM Dialog text field

The Problem

You want to limit the number of characters that can be entered into a DAM Dialog's text field.

The Solution

If you are using a textarea xtype, you can just add maxLength as a property with the number of characters you would like it to be limited to, set by the value. This leverages an in built validator to limit the number of characters.

Gotchya! My OSGI bundle is not displaying the edit button to configure settings

The Problem

Your newly minted custom OSGI bundle is using annotations for configurable properties, but there is no edit button visible to edit your properties in the Felix Config Console.

The Solution

In your @Component or @SlingServlet or similar annotation, you need to set  metatype=true for the edit settings to appear. 

Before:
@Property(name="MY-PROPERTY", description="", value="http://www.google.com")

After:
@Property(name="MY-PROPERTY", description="", value="http://www.google.com", metatype=true)

To see the setting in flight, take a look at my other blog post on how to write a custom SlingServlet here.


GOTCHYA: CRX Explorer Error when deploying packages - Item cannot be saved because it has been modified externally: node

Item cannot be saved because it has been modified externally: node

The Problem

I came across this nasty little error when altering some configs in the JCR content explorer and updating packages.

I had updated a setting in CRX/Explorer, not clicked the Save All button, and in another window installed and deployed a package. (That I didn't think altered any of these configs).

It turns out that it did, and whenever I tried to save my changes, I got the above error.

The Solution

Right click on the offending node that's causing the issue, click on revert, and apply your changes.

Package Deployment Cheatsheet

This cheatsheet is all about how to deploy a package. To create a package, please take a look at this previous post

1. Upload the package

Click on the Upload Package button

Click on the Browse button to select your package.

It is recommended to click on the Force Upload button, as sometimes the package changes, but the filename doesn't.

In this case, install the DemoSite-0.1.zip package from the previous post.

2. Install the package

Click on the Install button

Set Access Control Handling to Overwrite.

Click on Install

The package has now been successfully installed on the author instance. Note, that the publisher instances do not yet have the contents of the package. This must occur via the Replicators, through the process of replication.

Note that replicators must be set up, and both the author and publisher instances be running for this to work.

3. Replicating the package

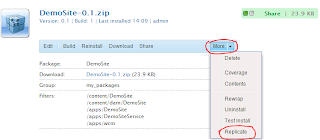
Click on More->Replicate, and in the Activity log below, you should see:

Replicating Package

Package is replicated asynchronously in (xx)ms

You should now be able to hit the pages/content of your package on the publish server.


Packaging Cheatsheet

This cheatsheet is on how to package up an application and a set of content pages that you have developed in the following folders in the JCR structure. Alter as necessary.

/content/DemoSite
/content/dam/DemoSite
/apps/DemoSite
/apps/DemoSiteService
/apps/wcm

1. Create the package

Click on Create Package

Fill in the following details
Package Name: DemoSite
Version: 0.1
Leave group as default

Click on OK

Then click on Edit

2. General Tab

Add your description, and a Thumbnail. Thumbnails are good to quickly recognise the different packages.

3. Filters Tab


Enter /content/DemoSite into Root path: and click on Done.
repeat for the remaining directories:

/content/dam/DemoSite
/apps/DemoSite
/apps/DemoSiteService
/apps/wcm

You can add rules to specifically exclude directories and include sub directories of excluded directories here as well.

4. Dependencies Tab

It is important to keep an eye upon which version of CQ5, uncluding service packs that the package has been built and tested with. There are differences between the varying versions, and this can be useful later on to track what may have gone wrong between them.

As of Adobe CQ5-5.5.0, Package Depends on and Replaces is simply a text list. Although useful, and an item that should be filled in to make maintenance easier, it does not enforce replacement, nor dependency.

5. Advanced Tab


The Advanced Tab allows you to put your details in, so that anyone installing the package in future has an easy reference for whom to contact.

If you need Admin priviliges or a restart, check the check boxes.

IMPORTANT:
Set the AC Handling to what your default should be.

(From http://dev.day.com/docs/en/cq/current/core/how_to/package_manager.html)


Ignore
Ignores the packaged access control and leaves the target unchanged.
Overwrite
Applies the access control provided with the package to the target. This also removes existing access control.
Merge
Tries to merge access control provided with the package with the one on the target. This is currently not fully supported and behaves like Overwrite for existing ACLs. ACLs not in the package are retained.
MergePreserve
Tries to merge access control provided with the package with the one on the target. This is currently not fully supported and behaves like Ignore for existing ACLs. ACLs not in the package are retained.
Clear
Clears all access control on the target system.

By default we pick Overwrite to force ACL settings in.

6. Screenshots Tab

This is where you can place any images that you wish to keep with the packages. We generally have no use for this feature. Please comment below if there is a good use case for them.

Click on Save, and your settings are complete.

7. Building the package


Click on the build button.

You can now download the package using the download button. You will get a zip file, which you can then deploy onto another cq5 instance, as outlined in this post.