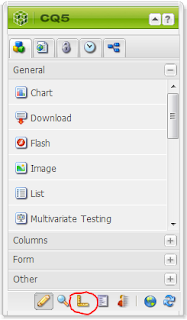
Pages

Monday, February 18, 2013

CQ5 how to purge your versions

The Problem

You want to clean out previous versions of image assets and page content manually.

The Solution

Go to http://localhost:8080/etc/versioning/purge.html

Confirm that you wish to purge from the content layer, or whether you wish to purge from a deeper position.

Set the maximum number of versions you want to keep.
Set the maximum number of days you want the age of the versions to be.

Click on Purge.

Wednesday, January 30, 2013

Cross Referencing Text between pages


If you want to reference images on the same page, read this blog entry.

The Problem

You have a range of products with prices that you want to update in several places on your site.

The Solution

1. Create the product/price pair list with a each price pair being a custom component, or a text component.

IE
<TextComponent> Square   $10.00 </TextComponent>
<TextComponent> Triangle   $20.00 </TextComponent>
<TextComponent> Circle   $30.00 </TextComponent>

2. In your target pages, use a Reference component where you would like the price listed.
3. Double click on the reference component
4. Click on the magnifying glass, and navigate to your prices page, and select the price that you want.

Whenever you update the price list, all pages containing the prices will be automatically updated for you.

Bonus Points

You can lock the price page for editing, so that authors won't accidently update your prices across the entire website.

1. Go to the pricing page you have set up
2. Click on the Page tab on the sidebar

3. click on Lock Page
4. The page is now successfully locked so that only you can edit it.

To allow users who have write access to the page to edit again, click on unlock page.

CQ5 - Reference copy of images to reduce download time

The Problem

You have an image that should be exactly the same on different parts of the same page.

The Solution

Copy and Paste the image by reference.

1. Go to the page containing the original image.
2. Highlight the image, and press Ctrl-C to copy
3. Highlight the area where you want to display the second instance of the same image. Press Ctrl-Alt-V to paste as reference.

You will notice that when you update the image content and refresh the page, the same image URL is used.

It is worth noting that you must refresh the page for changes to take effect for referenced image copies.

If you want to cross reference data, read this blog entry.

Setting up GMail as your SMTP server in CQ5

The Problem

You want to set up an SMTP server to let you send mail out of your local instance of CQ5 author.

The Solution

Set up a GMail account (or use your own if you feel comfortable where you are storing the information).

The steps:

1. Go to the Felix Console
    http://localhost:4502/system/console/configMgr
2. Scroll down and click to edit the Day CQ Mail Service OSGi config.
3. Enter the following details:
    SMTP Server Host   - smtp.gmail.com
    SMTP Server Port    - 465
    SMTP User              - your username (i.e. john.doe@gmail.com)
    SMTP Password      - your password
    From Address          - your email
    SMTP Use SSL      - true

4. Hit Save
5. Run a user through a workflow containing a group of which you are a member, or send out a newsletter to a group which you are a part of.

You should receive the email in your inbox.

It is worth noting that for production environments, you should set up a production grade SMTP service rather than use GMail.

Sunday, January 27, 2013

How to restrict activation rights in cq5 to a particular user group

The Problem

You want to prevent a particular user group from having the rights to activate a DAM image and instead require them to follow a publish workflow.

The Solution

1. Log in as administrator.

2. Click on the Users link
3. Double click on the user group you wish to restrict Activate / Deactivate access to.

In this case, we will use content-authors

4. Click on the permissions link
Navigate down to /libs/wcm/core/content/damadmin/tabs/searchpanel/actions/
Unselect Read Access for Activate and Deactivate.

Navigate down to /libs/wcm/core/content/damadmin/actions
Unselect Read Access for Activate and Deactivate.

Next, log in as a user who belongs to only the content-authors group such as author.

Alternately, you can impersonate the user, by clicking on Administrator in the top right hand corner, and selecting author as the user to impersonate. If you accidently select a user without dam rights, have a look at this post.

If you navigate to the dam, you will notice that under this user, the activate and deactivate options are no longer available to this user.

Next, Using a Workflow to publish DAM images through an approval process.

Thursday, January 24, 2013

CQ5 - Gotchya - when impersonating as another user, cannot access admin

The Problem

When impersonating as a user without admin rights, you are immediately locked out of cq5 admin, and cannot log back in, even as an administrator.

The Solution

You need to have read rights to the admin section to be able to log in, even when as an administrator. The cleanest way to get your admin user account back, is to log out, by pasting the following URL into your browser. (Assuming you are on localhost and your port is 4502).

http://localhost:4502/libs/cq/core/content/login.logout.html

Wednesday, January 23, 2013

How to create a custom multifield component

The Problem

You are trying to capture a list of key/pair values in a custom component in the admin interface.

The Solution

Create a custom multified component to capture values.

1. Create multifield component

1.1 Create the component

The first thing we are going to do is to create a new component for our tutorial project. This component will be visible in the siteadmin editor.

Open up CRXDE and create a new components directory in the following location:
\apps\tutorial\components\ConfigComponent

Right click on the apps folder-> New -> Folder. Name this tutorial
Right click on the tutorial folder->New -> Folder. Name this components
Right click on the components folder -> New -> Component

Label -> ConfigComponent
Title -> Config Component
Description -> Key pair configuration component
Super Resource Type -> blank
Group -> Admin (Or whatever group you want this component to live in)

Click on next

in AllowedParents enter
*/*parsys

Click on finish.

You have now created your new skeleton component. 

1.2 Create the component display

If you look into the ConfigComponent directory, you will see a ConfigComponent.jsp file.

This jsp will be the component as it renders for display.

In this case, I have decided both for backwards compatibility reasons, and simplicity, to use a table. You can style this in whatever fashion that you desire, however, for the purposes of this tutorial, we will keep it vanilla.

Note, we could also abstract this functionality out into seperate java classes etc, but again, for simplicity, we will just do this in a vanilla fashion.

<%@include file="/libs/foundation/global.jsp"%>Configuration Settings
<table>
    <tr>
        <th>Key</th>
        <th>Value</th>
    </tr><%
   PropertyIterator propertyIterator= currentNode.getProperties();
   while(propertyIterator.hasNext())
   {
  Property currentProperty=propertyIterator.nextProperty();
  String currentValue="";
  if(currentProperty!=null && 
  currentProperty.getName()!=null && 
  currentProperty.getName().toLowerCase().compareTo("keyvaluepairs")==0)
  {
  if(currentProperty.isMultiple())
  {
  Value[] values=currentProperty.getValues();
  for(Value value:values)
  {
  currentValue=value.getString();
  String[] splitValue=currentValue.split("#");
  %><tr><%
  for(int splitLoop=0; splitLoop< splitValue.length; splitLoop++)
  {
       %><td><%= splitValue[splitLoop] %></td><%
  }
  %></tr><%
  }
  }
  else
  {
  currentValue=currentProperty.getString();
      %><td><%= currentValue %></td><%
  }
  }
  properties.isEmpty();
   }
%></table>

What we are doing in this code, is taking the current node:
PropertyIterator propertyIterator= currentNode.getProperties();

and iterating through its properties.

   while(propertyIterator.hasNext())

We then get the values from the property keyvaluepairs, and split the value by the delimitation of a hashtag.

We follow the route of separating values by hashtag, as we wish to avoid having to rewrite the multi-field component entirely. Note that if the # character is a requirement for the field, you can use a multi character delimeter.

1.3 Create the component Dialog

Right click on the ConfigComponent folder -> New Dialog

Name -> dialog
Title -> Key Value Pairs

Click on finish
Navigate down to the tab 1 node, and change the title to Key Value Pairs

Right click on tab1 -> new -> Node
Name -> items
Type -> cq:WidgetCollection

Click Finish

Right click on items -> new -> Node
Name-> trainingmulti 
Type -> cq:Widget

Set the following properties on the trainingmulti node
fieldLabel -> Key Value Pairs
jcr:primaryType -> cq:Widget
name -> ./keyvaluepairs
xtype -> multifield

So what have we done so far? We've created a component that displays a table of values coming from ./keyvaluepairs.

So if we go to our siteadim, open a geometrixx page, and create a template with a parsys such as wide page.


On the sidekick, click on switch to design mode.


Click on edit, scroll down to Admin, or whatever group you've added the component to, and enable the component for inclusion in the sidekick.

If you expand the sidekick again, you should be able to see the component either in Admin section, or the Other section, depending on how many other groups you have enabled.

Add the component to parsys on the left by dragging and dropping it on.

You won't see any key pairs or information at this point in time.

Double click on the component to open the edit dialog.

Click the add button to add a new row, and enter the following:
Test Pair one
Test#Pair two


2. Create custom dual textfields

2.x Hooking in the custom xtype
create  new node on the trainingmulti node of an nt:unstructured type

Add the xtype property of trainingSelection.

Add the xtype component -> list out error

3. Customize display to show read only fields


How to create a custom multifield component.

Gotchyas

1. XType component not registered/found